Proper Permissions MatterAssigning the right roles to your team members ensures they have appropriate access to workspace resources. Always double-check that you’re assigning the correct permission level based on each person’s responsibilities.
Watch How to Add Members to Your Workspace
Watch a short video demonstrating how to add members to your Playlab workspace.Adding Members Process
Access Workspace Members
Navigate to your workspace members section.
- From your workspace dashboard, locate and click the Workspace Members tab
- This will show you an overview of current members and their roles
- You’ll also see options for managing members
Choose Your Invitation Method
Decide how you want to invite new team members.You have two main options for adding members to your workspace: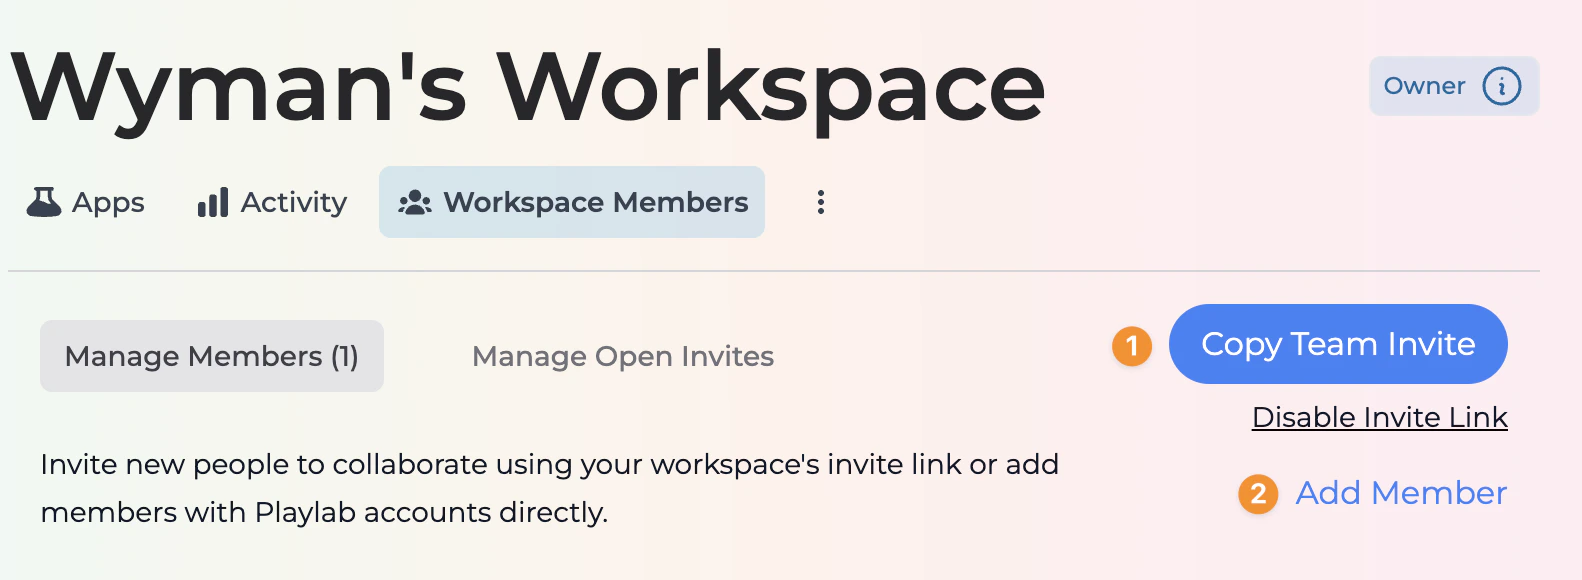
- 1. Copy Team Invite: Generate a shareable link to send to multiple people
- 2. Add Member: Directly invite specific individuals by email
Using the Copy Team Invite Method
Share an invitation link with your team.
- Click the Copy Team Invite button in the upper right corner
- The system will generate a unique invitation link
- Share this link via email, messaging apps, or any communication channel
- Recipients can click the link to join your workspace
Using the Add Member Method
Invite specific individuals by email.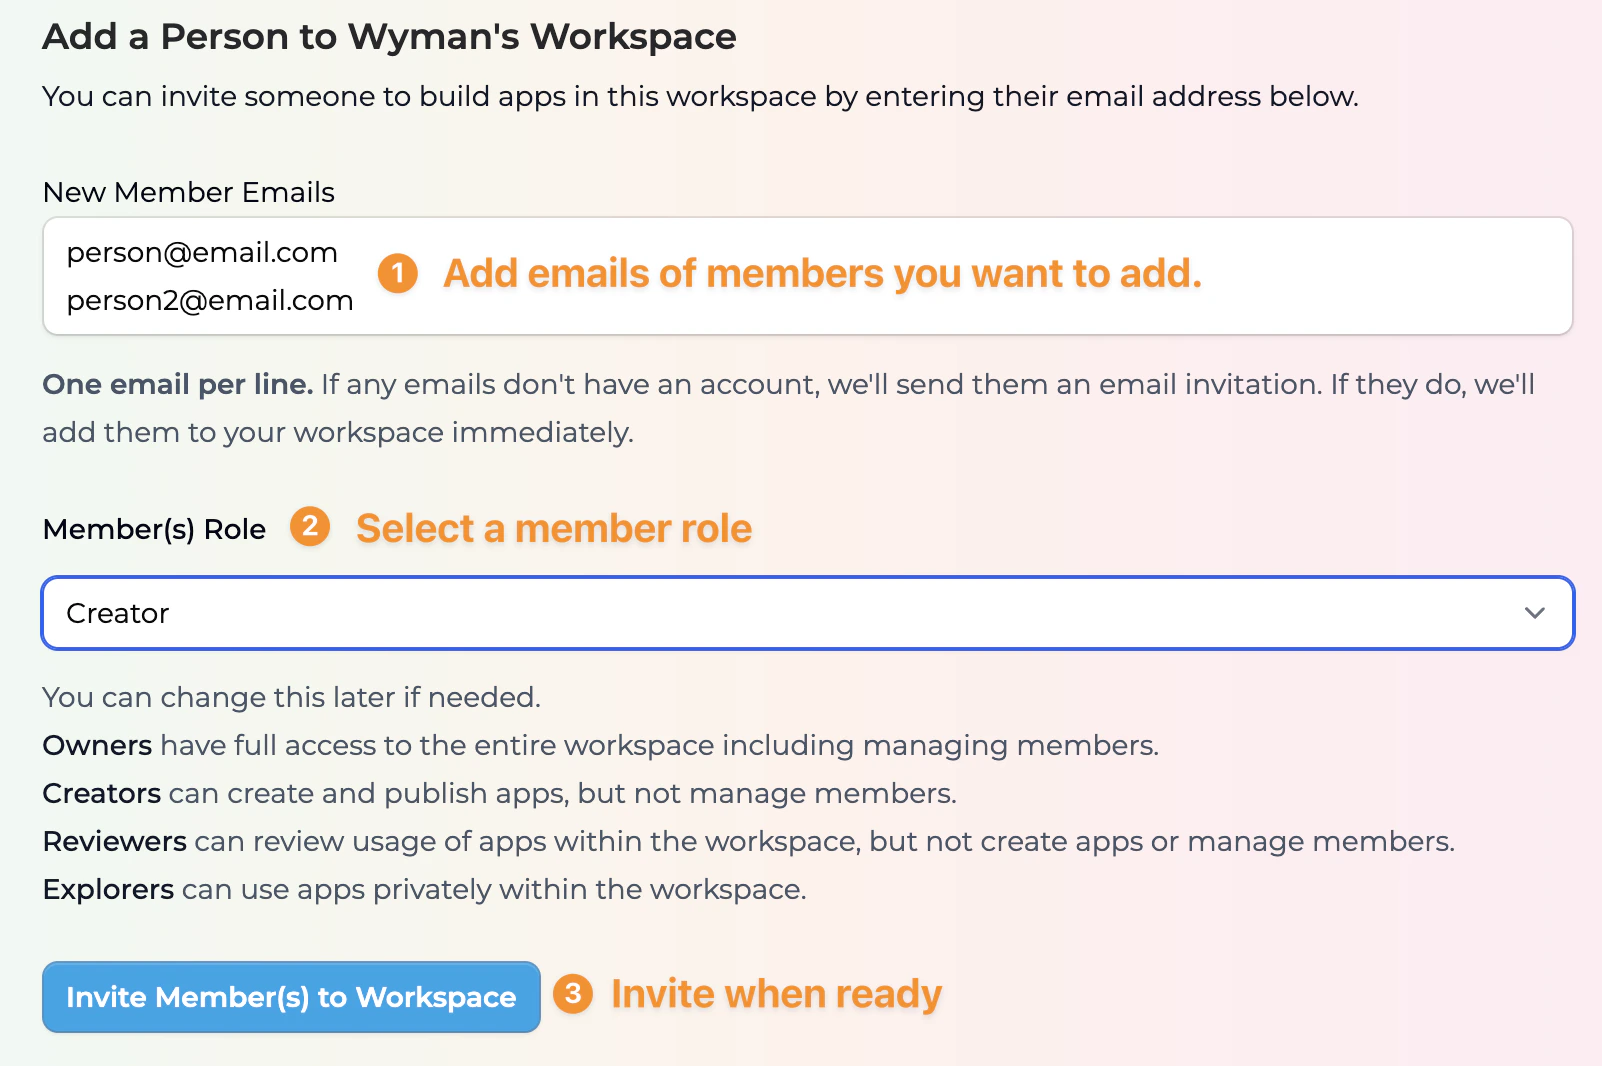
- Click the Add Member button
- In the dialog that appears, enter email addresses in the input field
- Select the appropriate role for the new member(s) from the dropdown
- Click Invite Member(s) to Workspace to send the invitations
- If recipients already have Playlab accounts, they’ll be added immediately
- If not, they’ll receive email invitations to create accounts
Managing Member Roles
Assign appropriate permission levels.When adding members, you’ll need to assign them one of the following roles:
- Owners: Have full access to the entire workspace including managing members
- Creators: Can create and publish apps, but not manage members
- Reviewers: Can review usage of apps within the workspace, but not create apps or manage members
- Explorers: Can use apps privately within the workspace
Workspace Collaboration Best Practices
When managing your workspace members, keep these tips in mind:- Limit owner roles to those who truly need full administrative access
- Regularly review member roles to ensure they align with current responsibilities
- Remove inactive members to maintain workspace security
- Use descriptive workspace names to help members identify the right workspace
- Communicate role changes to team members before making adjustments
- Consider workflow patterns when assigning roles to ensure efficient collaboration
- Create separate workspaces for distinctly different projects or teams if needed
- Document your role structure so team members understand permission levels
Frequently Asked Questions
What's the difference between using the invite link and adding members directly?
What's the difference between using the invite link and adding members directly?
Invite Link: Creates a general access link that multiple people can use to join your workspace with the same role. This is convenient for adding many members at once who will have the same permissions.Adding Members Directly: Allows you to specify exact email addresses and customize the role for each person. This is better for precision control over who joins and what they can do.Both methods get people into your workspace, but direct addition gives you more granular control.
Can I change a member's role after they've joined?
Can I change a member's role after they've joined?
Yes, workspace owners can change member roles at any time. Simply:
- Go to the Workspace Members section
- Find the member whose role you want to change
- Use the role dropdown next to their name to select a new role
- The change takes effect immediately
Is there a limit to how many members I can add to my workspace?
Is there a limit to how many members I can add to my workspace?
The number of members you can add depends on your Playlab plan. Different subscription tiers have different member limits. Check your current plan details for specific information about your member allowance.
What happens if I remove a member from my workspace?
What happens if I remove a member from my workspace?
When you remove a member:
- They immediately lose access to the workspace
- Their contributions remain (apps they created stay in the workspace)
- They can no longer view or interact with any apps in the workspace
- They’ll need a new invitation if you want to add them back later
Can I batch upload members from a spreadsheet?
Can I batch upload members from a spreadsheet?
Currently, Playlab does not support batch uploading members from spreadsheets or CSV files. You’ll need to add members either by:
- Sharing the invitation link with multiple people
- Manually entering email addresses (one per line) when using the Add Member function
Do members need to create Playlab accounts to join my workspace?
Do members need to create Playlab accounts to join my workspace?
Yes, all workspace members need Playlab accounts. If you invite someone who doesn’t have an account:
- They’ll receive an email invitation
- The email will include a link to create their account
- Once their account is created, they’ll automatically join your workspace
- They’ll have the permissions assigned to them in your invitation
Need Support?
If you encounter any issues while adding or managing workspace members:- Contact us at support@playlab.ai